
So, you have decided to start your own website. Great decision! Doing so may well be the start of a new, exciting, and fulfilling chapter in your life.
I will keep it as simple and straightforward as possible. Creating your first website is NOT complicated and by the end of this article, you’ll have your own professional-looking website. You can go to bed tonight with a huge smile of accomplishment on your face because you built your own website. The admiration of your peers is sure to follow.
Table of Contents
What You Should Know About Creating a Website
In order to build your own website you need a domain name and a web host*.
- A domain name is an address people use to visit your site (also called URL). For my website this would be domdoeppert.com.
- A web host gives you space on a web server to store all your website data and files and ensures that people can access your website fast and reliably when they go on the internet.
Bluehost* makes it very easy for you since you can buy and register both, a domain name as well as a hosting plan.
Can I Build a Website for Free?
Just like Obama said: Yes, we can! At WordPress.com.
But: The domain you get will be a sub-domain of WordPress.com and thus contain .wordpress.com at the end. This means the URL for your site could be www.thenameyouchoose.wordpress.com.
I highly recommend you get your own domain as this conveys trustworthiness to your visitors and looks a lot more professional. Plus, buying your own domain is not expensive at all. Going out for drinks will cost you more than getting your own .com domain and the domain doesn’t lead to a hangover, either.
A Step-by-Step Guide to Creating Your First Website
Are you excited about building your first ever website? You should be because this is going to be great. The following steps are all you need to build a professional-looking website. Should you still have any questions, just ask them down below in the comments and I will do my best to answer them.
Step 1: Find a good domain name for your website
What kind of domains do you think sound great? Which domains do you visit often? These considerations can help you find a great domain name.
Try to find a good domain name as it is your website’s business card. But at the same time, don’t overthink it. It is easy to fall into the trap of wanting to find the perfect domain name. And as soon as you got the domain and set up the website, you think of a “better” domain name. I have been there. Trust me, you don’t want to go there.
Pick a domain name and stick with it
I own around 30-40 domains and this website that you are reading is my 4th domain. Yes, I actually changed my domain name 4 times because I thought that a better domain name would be better for my business. I spent days having to reprogram the whole website and change all the connected links. Ti While a good domain name is helpful for making your website and/or business look professional, it’s way more important that you choose a domain name, stick with it, and put in the work consistently.
How can you find a great domain name?
I recommend you make it memorable and somewhat short. Memorable is more important than short in this case. You know you have a good name if you can tell your friends about your website and they still remember it by the time they get home.
Don’t over-analyze this process, though. The work you put into your website on a consistent basis is much more important than your domain name.
Is the a secret hack that helps me find a short and memorable domain name in 2 minutes?
It must be your lucky day because yes, there is. Go to Bluehost* and click on “Domains”.

Enter your main keyword into the search bar. If you want to write about football for example, type in “football”. Since football.com is already taken, you will be shown short and memorable alternatives that are still available. Such as “footbawle.com”.

Lastly, you can run the domain name of your choice through the Trademark Electronic Search System (TESS) if you’re from the US, euipo if you’re based in Europe, or if you’re from a different country simple google “search trademark database” for your country.
Step 2: Choose the Right Bluehost Plan for You
*Bluehost is excellent for hosting your website since security, performance, speed and updates for your website are all taken care of.
I recommend shared WordPress hosting as this will allow you to store your website on a server that is optimally suited for your site’s WordPress Package. As a result, security, speed as well as safety are all are automaticallyoptimized for you.

You’ll see the four hosting plans Bluehost offers:

You can choose between Basic, Plus, Choice Plus, and Pro. All of them include a free domain, a free SSL certificate (the little padlock in your browser’s search bar that is left to domdoeppert.com for example. This adds extra security and increases visitor trust.), limitless bandwidth, and more than enough storage.
Choose the plan you like the most. Upgrading later on is totally possible.
Step 3: Set up your domain
Now that you’ve selected a hosting plan it’s time to set up your domain.

Simply enter the domain name you’ve chosen into the bar and add the domain ending you want (e.g. “.com”). Pro tip: I recommend you get a .com domain as this conveys trustworthiness as well as a professional appearance.
If you already own a domain name, go ahead and enter it on the right.
Lastly, you just need to fill in your personal information to finalize the purchase. Congratulations, your very own website is almost online.

Step 4: Install WordPress (it only takes one click)
Bluehost* pairs perfectly with WordPress and the installation is fast and very easy.
- Simply go to your Bluehost control panel
- click “My Sites”
- then “Create Site”
- and the click the “Start Building” button under the WordPress option.
- You then type in your Admin Information such as your name and password. You can always change your password or email-address later on.
After the installation you’ll see your website domain, the URL for logging in, your username and password. I recommend you safe this data or maybe even write it down or print it out.
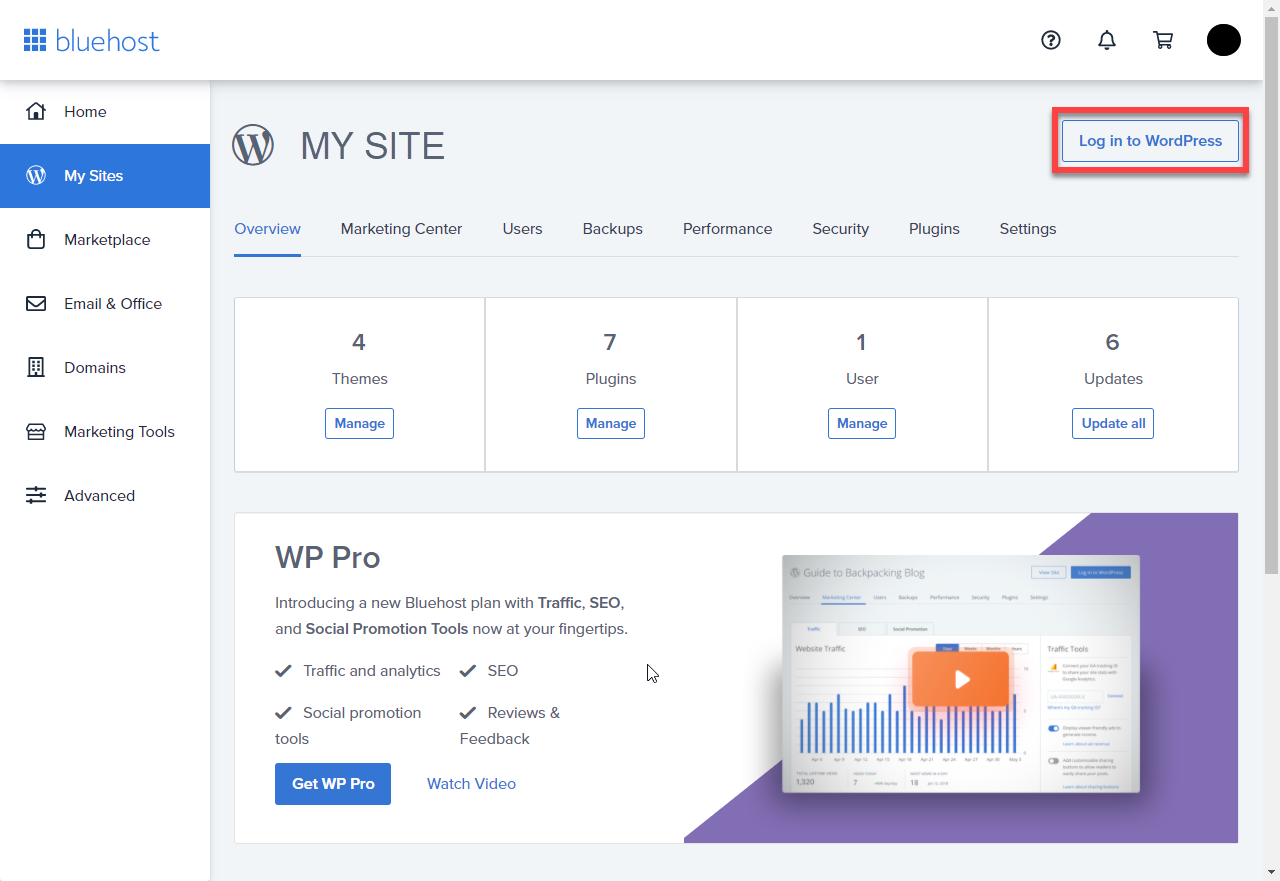
Now it’s time to log in to WordPress.
Step 5: Install a theme for WordPress
The beauty of WordPress is its simplicity and ease of use. (Also, google loves WordPress in terms of making sure your website ranks well when people conduct a google search (SEO). Read more about it here.)
So, instead of heaving to program the design of your website by yourself, you install a theme that you like that gives you the design for your website that you want.
A theme is basically a bunch of files that determines the design and look of your website. You can still modify everything exactly as you like, of course.
WordPress offers free as well as paid themes.
Click on “Appearance”, then “Themes”, and then on the “Add New” button:

You can see how what your website looks like with a specific theme when you click on “Live Preview”. Once you have found a theme you like you can click on “Install” and “Activate Theme”.
Pro tip: The best kept secret for easily making your website look truly impressive
I found this out the hard way. I started with free themes and tried to make them look good by adding code and installing plug-ins. I searched the internet and did everything I could to make my websites look great.
I didn’t want to spend $60 (53€) on a premium theme. Unfortunately, it never worked. My websites never looked really cool and modern, they always looked kind of cheap and just uncool.
Then I bought a premium theme and everything changed. I simply installed the theme – Avada* to be precise – and immediately after the installation was finished my website looked like it was created by a professional for thousands of dollars.
If I could go back in time and change just one thing, it would be to use a premium theme right from the start. In my opinion it is the only way to make your website look truly cool and amazing. Free themes seem to always have this unattractive look and feel to them.
If you can afford it, I highly recommend you spend the $60 and get the Avada theme*. It will instantly make your website look very modern and extremely professional, and it is easy to use.
I exclusively use Avada* and I can highly recommend it because it’s fast, easy, beautiful, and fully responsive. This means your website will adjust perfectly whether your visitors use a smartphone, tablet, or laptop.
You simply select a prebuilt site and import it. You then put your own content on the prebuilt site and you’re done.

If you want to sell products, whether they be digital or physical, with Avada you can important a website that already has an online store set up. You then simply upload the image of your product, write a product description, enter your personal information for the online store, and set up PayPal or enter your bank account so that you can get paid.
Step 6: Install some plugins for WordPress
So, while the theme you installed determines the design of your website, plugins add functionality and features. This means you don’t have to code your website, you simply install the WordPress plugin you need. Plugins are like apps for your iPhone – but for your website.
To install the plugins you click on “Add New” under the tab “Plugins”, search for the plugin you want, and then click on “Install Now”.

The majority of plugins are completely free, and there are usually always free alternatives to paid plugins. Plugins tend to be free, and sometimes only an upgrade that will unlock more convenient features will cost you.
Recommended plugins:
- Yoast SEO: This plugin helps your site perform better in search engines like Google. This is definitely something you want because then you’ll have more people who go to your website (this is called traffic).
- Jetpack: This plug in was made by the Automaticc, the people behind WordPress, and focuses on improving your website’s security, performance, and marketing. It’s a real allrounder and can help you make your website safer and stronger via secure logins and brute force attack protections. Load pages on your website faster through CDN, and increase traffic via social sharing, related content and more.
- Ninja Forms or WP Forms: Both plugins help you create professional-looking forms in minutes for contact forms or payments. There is no coding required.
- Cookie Notice & Compliance for GDPR / CCPA: Do you ever notice that seemingly every website asks you to “accept cookies”? Unlike the cookies you get at your grandma’s house these cookies are small pieces of data that helps a website remember information about you. Cookies can be used to track information about website users to improve marketing. The EU cookie law (ePrivacy Directive) as well as the California Consumer Privacy Act (CCPA) require that visitors be informed about the purpose of processing data and that websites obtain prior consent from users when employing cookies to process their personal data. This plugin is designed to help your website easily comply with these regulations.
Step 7: Add content to your website
This is the moment you’ve been waiting for. Drumroll, please! Let’s begin to build your website content.
The way WordPress works is you can create a page or post.
- A page constitutes your websites structure, and you can generally find it in the menu on the top of a website. On this website, for example, the item “Make Money” in the menu on the top is a page. Pages are generally static and don’t change.
- A post is a piece of content that you can publish regularly, such as a new article . On this website, the article you’re reading is a post, and it appears in the page “Make Money” among other posts. Every post has its own unique URL. The article you’re reading, for example, has the URL domdoeppert.com/make-money/how-to-create-a-website.
Here’s how to create your first website:
- If you’re using Avada* as your theme creating your website is a matter of seconds. You simply select the 1 of the 86 prebuilt websites that you like the most, import it, click on “Activate”, and you’re done. You then enter your own content into the prebuilt website and adjust everything to your liking. You’ll get an amazing looking website in minutes that you can still modify exactly how to want it.

- If you’re using a free theme (let’s use Twenty Twenty-Two for this example) first click on “Add New” under the tab “Pages” to add a new page (duh). This is going to be your homepage. So, when people enter yourdomainname.com this is the site they’ll see. This is a great spot to put a call to action (CTA), such as a “Buy Now” button if you sell a product or an affiliate product. You can also put a “Subscribe Now” button to have people subscribe to your email list. It is highly recommended you do so. Email marketing has the highest ROI of any marketing strategy. For every dollar you spend, you can, on average, expect to earn $38-$42 of revenue in return.

- Then create the content you want and when you’re finished, give the page the title “My Homepage” and hit the “Publish” button.
- Repeat this process and create another new page, but this time give it the title “Football Blog” and hit the publish button.
- Now, we want the item “Football Blog” in our menu to show the post we created. In the future if you create new posts, they will automatically show on the page “Football Blog”. To do so, click on “Add Block” – the black plus sign -, enter “latest post” into the search bar, and the select “Latest Posts”. When you’re done, hit “publish”.

- Now click on “Add New” under the tab “Posts” to create your first blog post.

- As an example, if you’re creating a website about football, you can write a blog post about a current topic that your readers may find interesting.

- When you’re finished writing your content, give the post an intriguing title and hit “Publish”.
- Now, let’s set up your homepage – the page people see when they enter www.yourdomain.com.

- Simply click on “Reading” under the tab “Settings”, then select “A static page” , and finally select “My Homepage”. You can always change your website’s design later on, of course. Now click on “Save Changes”.
Where Do I Go From Here?
Congratulations and well done! Take a bow, friend! You have just created your very own website.
Just keep publishing content and working on your website. You’ll get familiar with WordPress and the theme you’re using. You’ll improve your skills with time, and after some weeks WordPress will probably feel quite familiar to you.
At the end of the day, your website is entirely yours and you can do as you please. Feel free to change the entire design however you like and be as creative as you want. Have fun with it and don’t give up if everything seems complicated at first. It will get a lot easier with time, guaranteed.
Do you have any questions? Is there anything in particular you would like to know more about? Let me know in the comments.
*Disclosure: The links are affiliate-links, which means when you make a purchase through the links, I earn a commission. The prices for you do not change, of course, and all the links that I post I endorse 100% and I’m a huge fan of their product. I would never endorse something that isn’t truly awesome and that I don’t or wouldn’t use myself. Thank you for supporting my work, friend.
[/fusion_text][/fusion_builder_column][/fusion_builder_row][/fusion_builder_container]
Cheers.